Prep:
-Smoothie ingredients (frozen fruit, spinach)
-Chicken Sausage and roasted veggies for lunch (defrost and saute sausage; use last week's produce for veggies)
-Clean and prep produce from TBO after Tuesday's delivery
Sunday, May 27th
Family BBQ: Burgers, fries, salads
Monday, May 28th
Pulled Pork Nachos
-Brown pork butt with himalayn pink salt, pepper, garlic salt. Cook in crockpot for 6 hours on low with Ginger Ale and Onion. Shred, drain, and add BBQ sauce
-Layer chips with pork, shredded cheese (cheddar and monterrey jack), diced bell pepper, onion, jalapeno. Bake until melty and happy. Serve with avocado and sour cream.
Tuesday, May 29th
Eggplant Parmesan
Fettucine with sauce
Sauteed squash and zucchini (use up last week's delivery veggies)
Wednesday, May 30th
New York Strip (Defrost; D grills)
Risotto (Freezer, Trader Joes)
Broccoli (Steam)
Thursday, May 31st
BIRTHDAY! :)
Out
Friday, June 1st
Salmon (Add Pesto Butter from fridge; bake)
Roasted Potatoes (season with Idaho Wit Da Flava seasoning blend)
Cauliflower (steam)
Saturday, June 2nd
Ulele for Birthday dinner
Sunday, June 3rd
Mom & Dad's
Monday, May 28, 2018
Wednesday, November 27, 2013
A Thankful Heart
Derek and I are hosting our first holiday in our house this Thanksgiving. So naturally on Thanksgiving Eve, I'm running around like crazy. I've got a billion and one things to do, but in the midst of it all, I have so much to be grateful for. This year has been amazing. It has given my family and me so much. Our cups truly runneth over. I'm slowing down-put the potatoes down, Lyndsey; drop the scissors and burlap immediately- to bring you a list of my Thankful Thirteen. Thirteen things that I'm grateful for that have happened or maybe are just "constants" in my life.
1. I'm thankful for the relationship D and I have with my parents. They truly are our best friends. We hang out, we laugh, we drink beers, and we always always have a soft place to land with them.


8. My friends. I am blessed with great friends. Friends who laugh, cry, yell, drink, and make memories doing even the smallest (or stupidest) things.


1. I'm thankful for the relationship D and I have with my parents. They truly are our best friends. We hang out, we laugh, we drink beers, and we always always have a soft place to land with them.

2. I'm thankful for days like today, where my windows are open, Pandora is blaring, and a cool breeze is floating through our house.
3. My job. I love my job and all the joy it brings me. I couldn't imagine spending my days any other way. Okay, well, maybe I could imagine me on a beach with a fruity drink, but I digress...
4. My SLJ. Samuel L. Jackson is the light of our lives. He's spunky, adorable, a love muffin to the extreme. And he makes us laugh on the daily.

5. Bravo TV. Yes, this is shallow. Yes, this is slightly embarrassing. But seriously. Bravo has gotten me through many a day :)
6. Our Home. We hit the jackpot when we found our house. We've lived here for a year and we couldn't be happier.
7. Books. Books. Books. If I could put an addition onto our home, I would add a library. A cozy place with all my books and big fluffy chairs with soft pillows to read for days. I can think of nothing better.

8. My friends. I am blessed with great friends. Friends who laugh, cry, yell, drink, and make memories doing even the smallest (or stupidest) things.


9. My family. My family is almost too close, some would say. But I couldn't and wouldn't have it any other way. We spend every minute possible together. We are "thick as thieves" as Caroline Manzo would say :)
10. The relationship I had with my Nanny. Nothing could ever prepare me for life without her, but the fifteen years I was able to spend with her shaped me as a person. I can truly say I am better because I knew and was loved by her.

11. My Husband. He should be awarded a medal for putting up with me everyday.
12. This girl. 'Nough said.

13. I'm thankful that God has blessed my life with these twelve things. These twelve people and places that fill me with smiles and happiness everyday.
Happy Thanksgiving.
-L
Thursday, November 21, 2013
Q is for Quiche
With family and friends soon gathering for Thanksgiving, what better time to introduce you to my favorite (and easiest!) breakfast casserole. Thanks to a great friend for introducing me to this many years ago.
The title of this post has a story. I know, shocking...me, tell a story.
In Kindergarten, my fantastic, nurturing, sweet-as-pie teacher, Mrs. Klein, had us try a different food for each letter of the alphabet. Each day, we'd learn about a new letter, then try a food to go along with it at lunch. I was into this. I thought it was awesome. Letters! Food! Fun! ...until we got to "Q." Mrs. Klein, or Mother Klein, as we have always so lovingly called her, introduced quiche to us on Q's day to shine. This girl, the one typing this post, was having no part of that quiche. None. Zero. Zip. Nada. Ain't Gonna Happen.
Now, I was a pretty cute kid. I got away with a lot by just batting my eyes and smiling real pretty. Well, that sweet-as-pie teacher would not let me leave the lunchroom table until I tried that darn quiche. I distinctly remember being five and left at our class' lunchroom table until I tried the quiche. Lucky for me, the lunch lady let me leave when she came to the realization that it just wasn't in the cards. Bless that sweet lunch lady. I'd probably still be at that table 21 years later.
15-ish years went by and I still had never once tried quiche. Talk about #scarredforlife. We had a potluck breakfast at work one day and I noticed this quiche-type casserole on the table. Immediate flashbacks. Somehow, I was talked into tasting this particular quiche. Life. Changing. Cheesy, flaky, deliciousness.
Make this for your family this holiday season and watch them swoon.
Start with a tube of crescent rolls and a greased baking pan. Ninexthirteen should do perfectly.
Do not. I repeat do not separate the crescent roll pieces, just lay the whole tube of rolls on the bottom of the baking pan. Press and seal the little creases throughout to make it one hole-less piece. I didn't have any crescent rolls on hand, so I used a tube of biscuits instead.

Next, crack six eggs into a mixing bowl and add 1/2 cup of milk, along with a dash of salt and pepper.

Whisk away!

After you've finished, cut up some ham. It can be fresh, lunchmeat, whatever you have or whatever tickles your fancy. Dice it into small-ish pieces and dump on top of the dough in your pan.

Now, pour your egg/milk mixture on top! Start grating some cheese-cheddar and mozzarella are my personal faves for this. Sprinkle this evenly on your eggs. I kinda eyeball this. Whatever looks good to you! You a fan of cheese (who am I kidding, who isn't a fan of cheese?), add more! Add less if you're one of the four people on earth who don't like cheese.


Throw this in a 350 degree oven and bake for 25 minutes, or until eggs have set.

Once you take it out, let it sit for a minute or two. Try not to drool looking at it.

Cut this little slice of heaven into squares and get to eating!
It's that easy. Your family will love seeing this on the breakfast table!
-L
Wednesday, September 25, 2013
Souper Idea
It's Fall. Soon (I'm just sure of it), I'll be able to sip Caramel Apple Spices and Pumpkin Spice Lattes, wear infiniti scarves and leggings, and buy new boots.
I love Fall. Everything about it. I love the cool breeze (Yep, I'm sure it's on the way any day now), the pumpkins, the clothes, cozy blankets, and definitely, most definitely, the food. The delicious, comforting, beyond satisfying food.
I committed to making one soup each week this Fall. Whether it's a tried and true recipe or a newbie trying to make its way into my dinner rotation, I must make one soup each week. D was completely on board with this idea. He can and would eat soup every day of the week. My favorite is when he asks me to make soup in the middle of July. "Hey babe, how about soup for dinner?" "....Uhh, Derek it's hotter than a simmering pot of soup outside." He's cute :)
I started this little challenge with a Christmas favorite. I'm all about traditions. I hold onto them with every ounce of me. My mom and dad STILL cannot put my presents under the tree until Christmas Day. And I'm a twenty-something married woman. Traditions give me joy. They make my heart happy. So what better way to start off this little challenge with a soup that reminds me of those family traditions!
We have the same meal every Christmas evening and it all starts with this French Onion Soup. It's packed with flavor, covered in gooey cheese, and best served piping hot after a few minutes under the broiler. I'm telling you-it doesn't get easier. This soup is also great because it's easy to adjust the recipe for your family! This recipe served the two of us just perfect with little leftovers :)
Start by slicing up one large onion fairly thin and throw them in a pot with 2-3 tablespoons of butter.


I put them on a cookie sheet so I could get them in and out of the oven without seriously injuring myself or others. Broil these guys on low for a few minutes until your cheese looks something like this...

I love Fall. Everything about it. I love the cool breeze (Yep, I'm sure it's on the way any day now), the pumpkins, the clothes, cozy blankets, and definitely, most definitely, the food. The delicious, comforting, beyond satisfying food.
I committed to making one soup each week this Fall. Whether it's a tried and true recipe or a newbie trying to make its way into my dinner rotation, I must make one soup each week. D was completely on board with this idea. He can and would eat soup every day of the week. My favorite is when he asks me to make soup in the middle of July. "Hey babe, how about soup for dinner?" "....Uhh, Derek it's hotter than a simmering pot of soup outside." He's cute :)
I started this little challenge with a Christmas favorite. I'm all about traditions. I hold onto them with every ounce of me. My mom and dad STILL cannot put my presents under the tree until Christmas Day. And I'm a twenty-something married woman. Traditions give me joy. They make my heart happy. So what better way to start off this little challenge with a soup that reminds me of those family traditions!
We have the same meal every Christmas evening and it all starts with this French Onion Soup. It's packed with flavor, covered in gooey cheese, and best served piping hot after a few minutes under the broiler. I'm telling you-it doesn't get easier. This soup is also great because it's easy to adjust the recipe for your family! This recipe served the two of us just perfect with little leftovers :)
Start by slicing up one large onion fairly thin and throw them in a pot with 2-3 tablespoons of butter.

Cook these until they are tender. It took my one large onion 15(ish) minutes to get tender on medium-high heat.
Then, add beef broth. I added about 4 cups of beef broth to my onions. This can be easily adjusted to your preference. If you like your soup soupy, add more. If you'd rather it be a little thicker, add less! It's just that easy. I also added one beef bouillon cube, garlic salt, and pepper to taste.

Let this simmer for about thirty minutes. It's going to smell delicious.
Right before you're about to assemble your soup, turn on the broil and cut thick slices of French bread. Put them under the broiler to toast them up a bit before adding it to the soup.
Now, please don't be like me. Don't get distracted and forget about your bread. You'll end up with something similar to this...

Oops. Again, don't be me.
Once you've successfully NOT burnt your bread, ladle the soup into each crock or bowl and add one slice of toasted bread to the tops.

Cut some big ol' slices of mozzarella and layer it up on top! This is the best part :)

I put them on a cookie sheet so I could get them in and out of the oven without seriously injuring myself or others. Broil these guys on low for a few minutes until your cheese looks something like this...

It doesn't get easier and it sure doesn't get any better.
-L
Tuesday, September 17, 2013
Bake Bake Bake Senora!
Getting back in the swing of things at work has left me absolutely exhausted by the time I get home. D has been super supportive and taken over many of the household duties during the week since I'm half asleep and probably drooling by the time 8PM rolls around. Okay, not really drooling. That'd be gross. But you get the point nonetheless! Now that I've gotten four weeks of school under belt, I'm getting back in action in the kitchen and...
I tried my hand at baking last week!
Shockingly, I enjoyed myself!
Normally in the kitchen, I'm more of a throw-everything-that-looks-good-together-with-no-measuring kind of girl. This gets the job done when it comes to dinner! Howwwwwever, I couldn't really take that route when it came to this little beauty. You're going to love this one! It's chewy, sweet, fruity, and super easy! It helps that I had every ingredient already in my pantry. No shopping and/or stress for this one! And of course, it was a recipe I found while searching around my favorite cooking website, The Pioneer Woman
Here's our cast of characters:
 You're going to start by throwing all your dry ingredients into a big bowl. 1 1/2 cups flour, 1 1/2 cups oats, 1 cup brown sugar, 1 tspn baking powder, and 1/4 tspn salt. Mix them together a bit once they're all in the bowl.


I tried my hand at baking last week!
Shockingly, I enjoyed myself!
Normally in the kitchen, I'm more of a throw-everything-that-looks-good-together-with-no-measuring kind of girl. This gets the job done when it comes to dinner! Howwwwwever, I couldn't really take that route when it came to this little beauty. You're going to love this one! It's chewy, sweet, fruity, and super easy! It helps that I had every ingredient already in my pantry. No shopping and/or stress for this one! And of course, it was a recipe I found while searching around my favorite cooking website, The Pioneer Woman
Here's our cast of characters:

Before starting, butter a 9x13 pan, preheat your oven to 350 degrees, and set your butter out so it's not super cold when you go to cut it later in the recipe :)

Now, cut your butter. You'll need to use 1 3/4 sticks of butter.

Set your pats of butter in with your dry ingredients you already mixed in your bowl.

Now, there are a few ways to do this next step. I tried them all. And found taking off my rings, rolling up my sleeves, and digging my hands in was the easiest way. Messy? Absolutely. But so much easier than a pastry cutter, potato masher (yep, tried that, too), or a fork. The point is-the butter needs to mix in with the dry ingredients until you end up with a crumbly mixture.

Put half the crumbly mixture in the bottom of your buttered dish. C'mon now, just flop it on in there.

Use your hands (once again) to pat the crumbs into the bottom of the pan flat. You're going to want it pretty nicely packed so the preserves don't seep through.


Scoop the preserves over the crust you just created! I used strawberry, but PW has used apricot, as well. I'm pretty sure any preserves that tickles your fancy would be ten kinds of fantastic here.

Spread the preserves in an even layer with your hands. Kidding! Use a kitchen utensil of some sort.

Sprinkle the rest of your crumb mixture on top of the preserves and gently pat down to make it even.

Bake this beauty for about 35 minutes in your preheated oven. Just listen to your nose. You'll know when it's done. Oh, and your eyes. You want the top to be nice and golden brown :)

Once you're cooled (calm and also collected), cut into bars and shove them all in your mouth dig in!

Yum. O.
-L
Saturday, August 24, 2013
Burlap Bonanza
My initial thought when I see personalized crafts for sale is always, "I wonder if I can do that myself." It normally takes me an inordinate amount of time to complete the crafts, but I almost always will give it a go.
My mom's birthday was last month and a few days before her birthday she sent me a picture of a framed monogram done on burlap with the caption, "I love this!!!!!" The first thing I noticed was that she actually spelled all the words correctly. My mother composing a text almost always gives way to misspelled words. I fancy myself bilingual solely because I can interpret texts from my mom. I love her to pieces and giggle myself silly when she sends them sometimes, but I speak the truth.
Anyways, I looked at the picture she sent, researched printing on burlap, and decided I could give this little project an attempt. My cast of characters for this project included: burlap, spray adhesive, white computer paper, spray adhesive, scissors, a ruler, and a picture frame.
 I used the ruler and scissors to measure an 8 1/2" x 11" piece of burlap. Then, I just plain ol' cut it out :)


My mom's birthday was last month and a few days before her birthday she sent me a picture of a framed monogram done on burlap with the caption, "I love this!!!!!" The first thing I noticed was that she actually spelled all the words correctly. My mother composing a text almost always gives way to misspelled words. I fancy myself bilingual solely because I can interpret texts from my mom. I love her to pieces and giggle myself silly when she sends them sometimes, but I speak the truth.
Anyways, I looked at the picture she sent, researched printing on burlap, and decided I could give this little project an attempt. My cast of characters for this project included: burlap, spray adhesive, white computer paper, spray adhesive, scissors, a ruler, and a picture frame.


Because you're adhering the burlap to the construction paper, it's important to get the burlap as close to 8 1/2" x 11" as possible.
Once you've got that done, spray your sheet of computer paper with the spray adhesive. Since it's not going to stay stuck to the paper, let the spray adhesive dry for about 3 minutes before attempting to adhere the burlap to it. While you're waiting, make up your monogram!
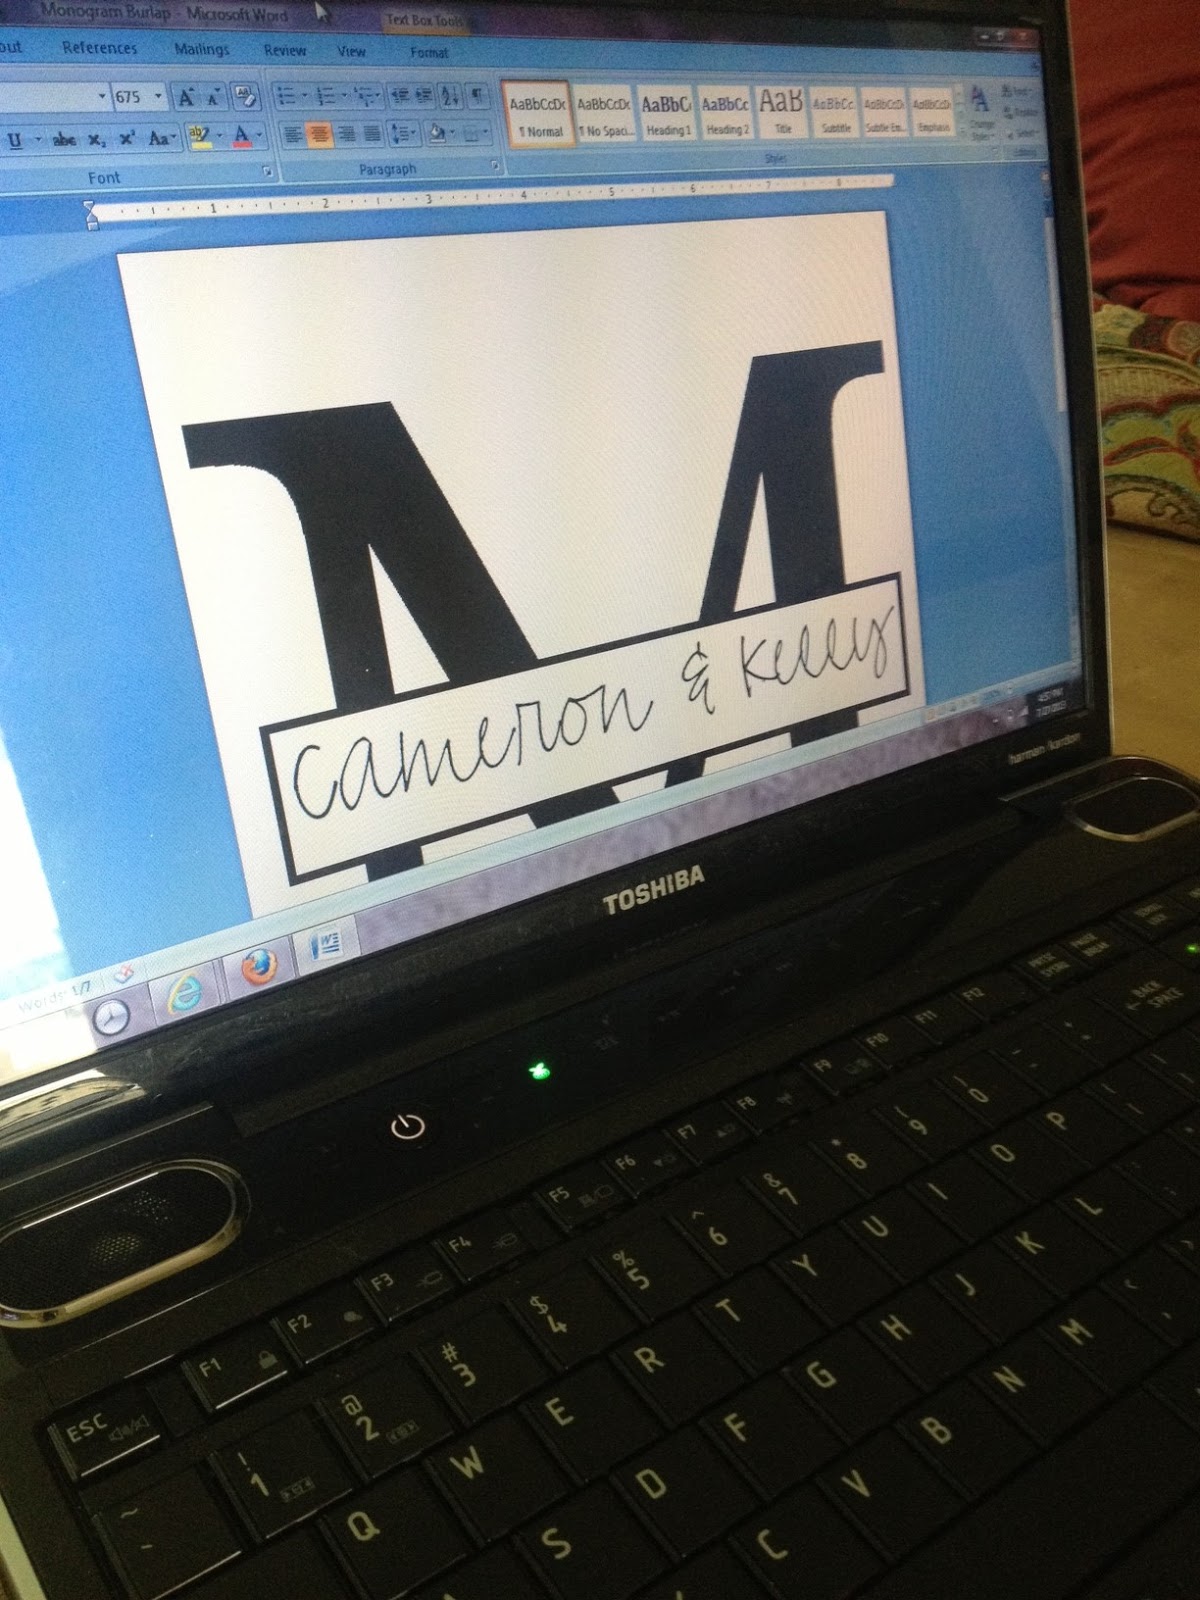
Again, the font addiction ran it's course and it took For.Ever. to choose what to use :)
Once it's done, attach the burlap to the paper that was sprayed. This will go right through your printer! Feed your burlap paper into the printer and send your snazzy document to the printer. Then, watch it work its magic.
Once it's out, throw it in your frame and you, my friend, have a beautiful homemade gift!

My momma loved this little nugget. She raved and raved. And I felt like a million bucks because I made it myself :)
-L
Wednesday, August 21, 2013
One Man's Trash
Our wedding photographer took the most amazing pictures at our wedding. I have over 2,000 pictures capturing our day together and I love them all. But my favorite picture taken was actually captured by my dad's brother, David. It's one of those once-in-a-lifetime type pictures. It makes me smile, laugh, and even tear up a little bit. It's just the sweetest thing. Peeps, feast your eyes on my favorite picture...


I should probably tell you that before the ceremony, Gianna, my sweet love muffin of a cousin and flower girl, specifically told me she "wasn't going to watch any of the funny stuff." "Funny stuff" apparently translates to the whole "You may now kiss the bride" business. Her older brother, Roman (who I'm equally obsessed with), took a page out of her book and covered those eyes as tight as can be. Finally, let your eyes wander to sweet Cameron, Derek's cousin and a flower girl as well, who is completely fixated with the moment. You literally cannot make this stuff up. I had to have this picture in our house somewhere.
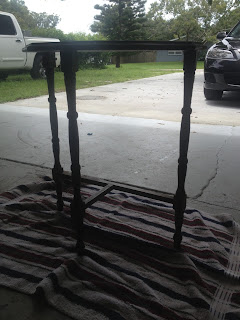
I must now switch gears a bit. I promise the picture makes a cameo later on. I asked D recently if he ever thought of me while he was at work. I thought the whole, "Out of sight, out of mind" thing may come in to play here and was honestly curious what he would say in response to this question. His reply-"On garbage day I do." Garbage day?! The two days a week large trucks overtake our neighborhood and get rid of our trash?! Not what I was expecting. Soon after though, he came home with this little beauty. Which, you guessed it, he saw on the side of the road in someone's garbage.

I love this little table! I immediately thought of the perfect place to set her up at the end of our hallway. But first, she needed a little love.
I hope it's not weird that I immediately assumed the table was a "she."
I started by wiping her down really well with an old towel. It did come from someone's trash, ya know.

Then, I got to sanding! We have this snazzy handheld-thing-a-muh-whoo-zit that I placed the sandpaper in. It worked really well for someone like myself who is not well-versed in the world of sanding.

Yikes. Pretty ugly after sanding.

Then, I spray painted her black. I did multiple coats to make sure it actually was not only covered, but also really black.

This was after one coat and you can kind of tell it was definitely NOT enough. I think I did three coats in total.
Then, I set this fab free little love at the end of the hallway with an awesome colorful vase and yes, you guessed it-my favorite wedding picture! It looks so great under the big mirror and I smile every time I walk by it. I'm so happy with how it turned out!

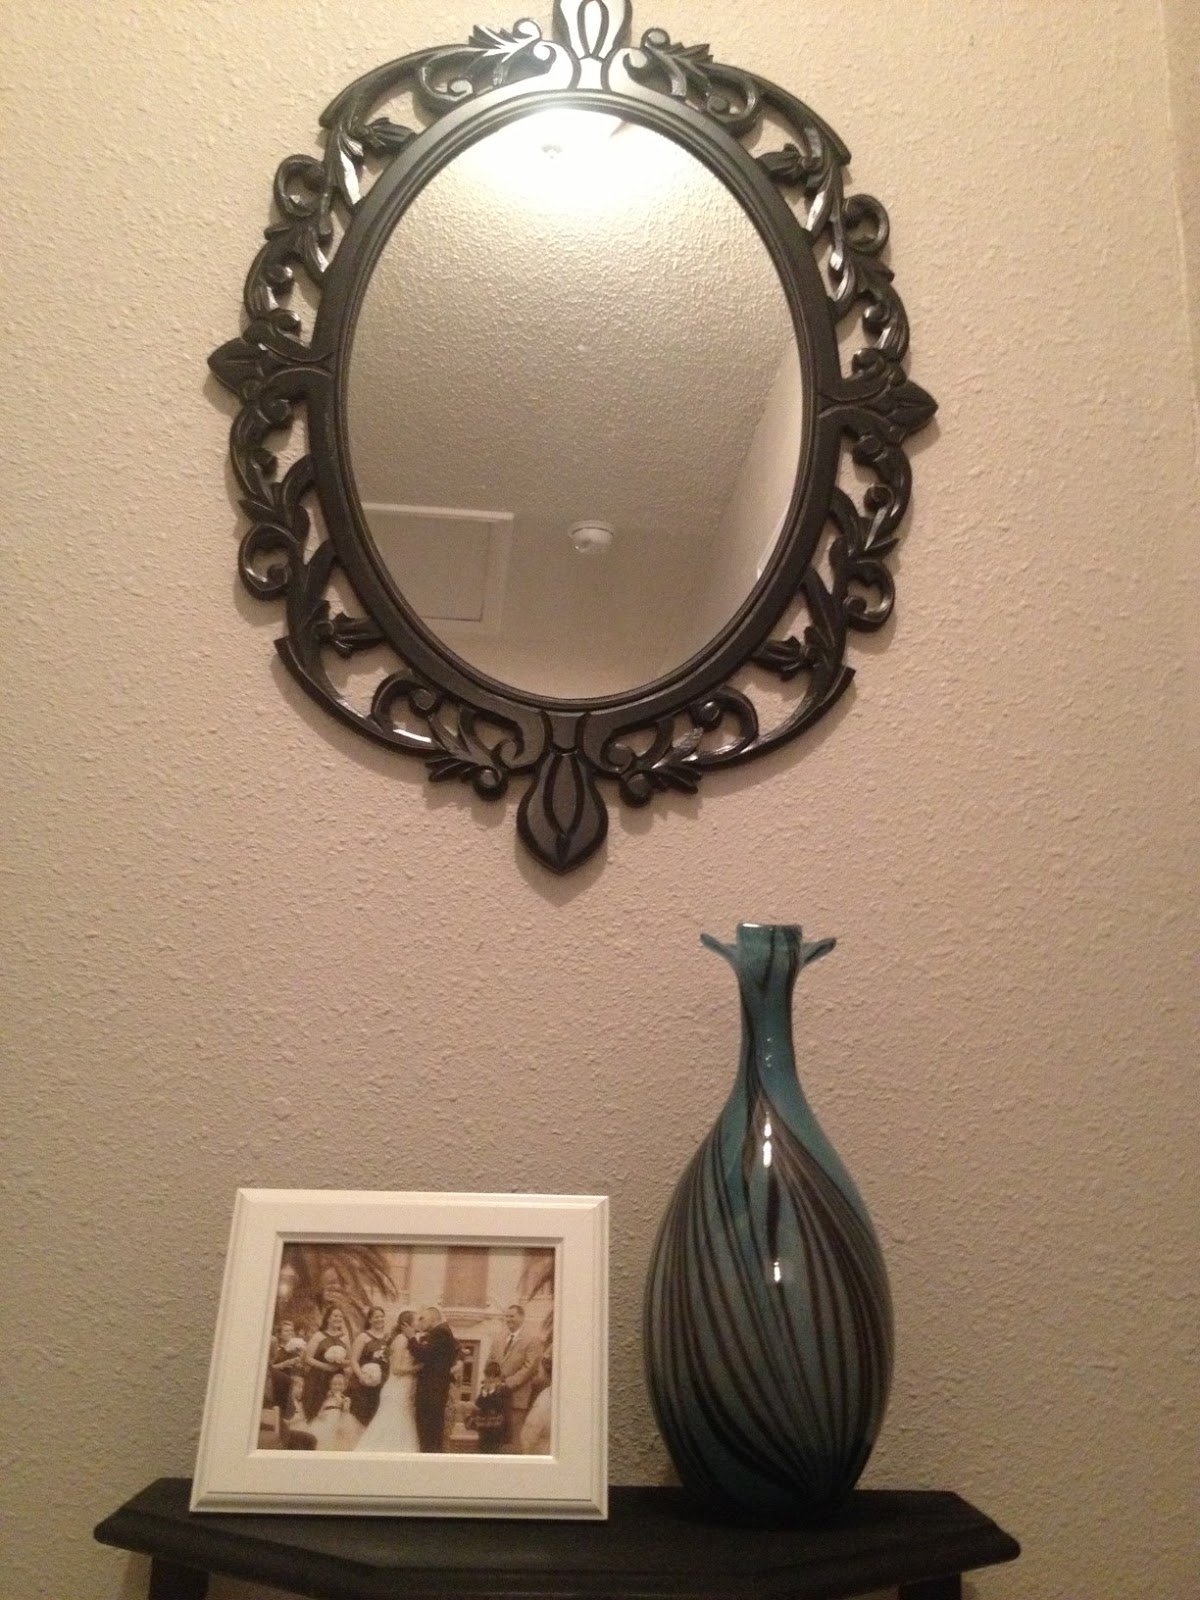
One man's trash, right? :)
-L
Subscribe to:
Posts (Atom)